Why skin tone coloring can be so tricky?

In all my time drawing coloring pages and teaching coloring techniques, I learned quite a bit about the psychology behind skin tone coloring and why so many people struggle with it.

Click on the picture to join my course Realistic Skin Tone Coloring on Udemy

Before we jump into why skin tones give colorists the most grief, let’s examine human faces and how we interact with them.

After all, without faces we wouldn’t have skin tones to worry about at all.

Research shows us that human beings have by far the strongest emotional reaction to human faces over anything else out there. Yes, even over puppies.

Regardless of how you feel about people, regardless of whose face you’re looking at, if it’s human your emotional response will spike dramatically compared to the response your brain exhibits when you look at even the most beautiful of sunsets.

This means two things for artists and colorists.

1. Using portraits in your art will get your work more noticed and interacted with.

2. Improving your portrait drawing and coloring skills is essential.

Join the Skin Tone Mastery course HERE

But why would we struggle with drawing and coloring a subject matter that’s so near and dear to our hearts?
Shouldn’t we be experts at human faces if we’re so connected with them?

Quite the opposite, in fact.

Because we’re so familiar with the human face, we no longer see it for all that it is, but rather see it in caricature. There’s a huge element of recognition, rather than observation, at play.

When you look at another person in front of you, you rarely (unless you’re a face-obsessed artist) study their bone structure and the way the shadows happen to be playing on their eyelids as they move and blink. Instead you see – young, old, tired, goofy, attractive, awkward, smiling, frowning, etc…

In our minds we reduce human faces to the very basic classifications that are relevant to the current interaction.

For instance, if you’re pulled over by a traffic cop, you probably see a towering, intimidating, and frowning individual, and you probably won’t recognize him should you run into him days later at a baseball game.

Your mind just turned him into a caricature of a scary authority figure.

However, if you’re out on a date, you’re probably seeing a warm, happy, smiling face, and are trying to imagine all the other positive posibilies of continuing the interaction.

Obviously, some of us have had quite the opposite experiences, but you get the idea.

In either case, you’re NOT studying the exact shade of the skin tone on the left side of the face as the sunlight casts a shadow on it. That’s just not how our minds naturally work.

We see people, not skin tones.

When drawing and coloring, we revert to our natural perception of human faces – the emotional perception, forgetting all about light, shadow, and color.

In the coloring world, the biggest mistake I see colorists make on portraits is not using enough color variation. Many people try to find that one perfect pencil to match the desired skin tone, and that’s just not how it works.

In my 6-hour video course Skin Tone Mastery, I provide students with my personally developed color palettes for a whole range of skin tones, AND teach them to build their own color schemes for any skin tone out there.

Click on the picture to join this course on Udemy

If you’re a colorist, YouTube color-alongs will only get you so far. There simply isn’t an exact guide for every possibility out there.

I believe in teaching a student how to fish, rather than giving them a fish.

Come join one of my professional, university-level art courses, and arm yourself with skills that you can apply to any kind of skin tone coloring. Once and for all.

Learn Fantasy Glow Effects / with colored pencils

How would you like to make your coloring pages or drawings look like they actually glow?!

Now you can!

My new 6.5-hour intensive art course on Fantasy Glow Effects will light up your colored pencil work forever.

TOP NOTCH CONTENT

The course is divided into four sections: bioluminescence, potions, lanterns, and fairies, to cover all of your glow effect needs.

Each of the four lessons consists of several bite-sized video lessons covering shading technique, color selection, and offering three separate demos.

I am a firm believer in arming my students with skills to approach all kinds of coloring in a given category, rather than just showing you how to color along with me.

The students who have already go through this course are doing just that. I see my coloring technique light up different pages by various artists, and it’s the best reward a teacher can ask for.

I can’t wait to share my secrets with you as well.

See you in class!

Learn from me and thousands of professional instructors for free!

I’ve been teaching art and coloring for years. You may be familiar with my free art and coloring tutorials on YouTube, or my university-level art courses on Udemy, or perhaps you’re a patron subscribed to the Coloring Club or the Doodle Club tier.

Or you may be completely new to the Lisa Mitrokhin universe. In either case, you will be delighted to discover that you can now take my How to Color Skin Tones and a few other courses for free on Skillshare.

Click on the image to go directly to this course

But wait, there’s more! 😀

When you use this LINK to join Skillshare, and my course, you get a WHOLE MONTH free of Skillshare use.

That’s INSANE!

There’re thousands of amazing, professional, and knowledgable creators on Skillshare. I personally use it all the time for my own research and education.

So, what are you waiting for?!

JOIN!

Follow me!

Take my course. Leave me a kick-ass review, and enjoy the endless knowledge offered by Skillshare.

I’ll see you in class.

INKandescence – my audience reacts

Setting my very personal and vulnerable art, Inkandescence, into the world as an interactive art book was, to say the least, terrifying.

“Lisa, this could be your best book yet. I think it’s genius!” – Dee Myles (fan and artist)

I was fully prepared for trolls, haters, and critics, but am pleasantly surprised by the warm reception.

Dune Dancer colored by Tiffany Kleinsteuber

“I’ve watched you bloom from your very first book all the way through to now. It has been a privilege and a trip to watch and to take part in it. I always knew you were a great artist, but you only grow better! Exquisite art! Bravo Lisa! Bravo!” – Madame Laurie (fan, colorist, art student)

I was also pleasantly surprised by this amazing write-up on my book by Colouring Heaven Magazine. Read article here.

The people who are already coloring the pages, have much praise as well. I found that many colorists enjoy working with colored pencils directly on top of the dark photographs that are featured in the book, while others prefer the grey-scale line art versions of the pages. Likewise, my digital colorists are having a blast.

Inkandescence is available in print as well as a PDF download.

Harebrained colored by Isolina Aviles

I’m a realist though. I fully understand that this book is not for everyone. For some it’s too racy. For some it’s too dark. For some it’s just too detailed. I’ve learned a long time ago that if you try to please everyone, you will please no one.
My aim with Inkandescence wasn’t to release a popular and “safe” book. There’re plenty of those out on the market already. My book is for those who are like me: artistic, daring, different, somewhat on the dark side but not stereotypically gothic, and ultimately positive and energetic.

I’m thrilled that those who don’t fancy this work, just walk on by without leaving hurtful comments, while whose who appreciate the work take the time to let me know.
Granted, it’s only been a week since the book’s release.

I’m thrilled to see how new audiences react in a few weeks when Inkandescence will be reviewed by multiple YouTubers. Stay tuned for those updates and announcements.

Hide and Seek colored by Tiffany Kleinsteuber

Most of all, I enjoy seeing the colorings and reading about your interpretations of my drawings.

I hope to hear from YOU.

Join my free private community TALM, and share your art and thoughts with the rest of us.


Join the TALM family
Eye Candy colored by Mel Flay

Stay dark. Stay humorous. Stay positive. These attributes don’t have to be mutually exclusive.

Art, Boobs, and Closure

My new book, Inkandescence, is not for everyone, and that’s just the way I like it.

Harebrained – “If all this stuff in my head was audible instead of visual, it would be very loud in there, all the time.”

This is the first adult coloring book that I didn’t design to be a coloring book from the start. All of the art in this volume is based on the drawings that I did during Inktober 2020, and all were greatly influenced by 2020 itself.

For me, this book is a way of getting closure on this very difficult year and punching my way out of burnout. I hope that my audience also finds comfort and resolution in its pages.

It was a very different experience for me to take my ballpoint pen and ink drawings and transform them into colorable art. It was especially tricky to take the leap of faith and share art that is so personal. After all, none of these images were intended for coloring. They were my way of interpreting the Inktober prompts while dealing with stress, and also practicing my ballpoint pen technique.

In the end, it was a great decision. This is the book that I’m most proud of. Is it perfect? Art never is. But I’ve learned to accept and embrace imperfection, because chasing a flawless outcome is a guaranteed way to never accomplish anything.
It’s honest. It’s beautiful. It gets you thinking, and you can interact with it.

So, how “adult” IS this book?

Watch this behind-the-scenes INTERVIEW and decide for yourself.

“I grew up on classical art. I grew up on marble statues and Michelangelo’s bodies all intertwined. To me, artistic nudity is just natural. It’s obscene that we have to drape our women in drapery, and hide nipples and curves.”

Swing by my private community TALM, and share your thoughts and feelings about this volume, and also show off your colorings.

Get INKANDESCENCE downloadable PDF here

Get INKANDESCENCE in print here

Fantastic Familiars Vol2

The flip-through for this book is a video flip-though. Please follow this link and enjoy the show.

Fantastic Familiars Vol2 video flip-through

Get your PDF download here.

Get your paperback here.

Watch the full video flip-through here. Don’t forget to like and subscribe. <3

My first year on YouTube

Remember my article “A new adventure begins, on YouTube?” Yeah, the previous one. That was almost a year ago. Joining the ranks of YouTubers turned out to be a fall down a rabbit hole, and I absolutely love it. It’s nothing like what I expected, and it’s pretty much a full-time job. I certainly didn’t expect to be talking to hundreds of people on daily basis. But I’m getting carried away. Let’s go back a bit.

I’ve always been terrified of video recordings and camera appearances. Hell, even actual phone calls, where you have to use your voice to communicate with another human being, have always been traumatic for me. It’s so much easier and safer to put things in writing. When writing, you have the privilege of taking as long as you want to produce content. You get to shape and reshape your words until you’re 100% happy with what you want to say and how you want to say it, and you get to do it all in your pajamas, with no makeup on.

I got comfortable at my keyboard. I didn’t ever want to get into video, except that many of you, my fans and colorists, kept asking for video art lessons. So, one day, after watching Peter McKinnon videos, I declared that it was time. I would take the leap and just set up a YouTube channel. What’s the worst that could happen, right?

lisa.mitrokhin.tv

What I immediately discovered is that video is scary. Recorded video is straight up weird. That whole “just pretend that the camera is your friend” thing is not helpful at all. I don’t have any friends who look like lifeless, glossy, unblinking, black circles. You can’t just flip a switch in your head and pretend that you care about sharing something with the camera. Live recording is even more terrifying, because you get just one shot. No post-production, no chances to take out all those Um..’s. You just talk and hope for the best.

In my very first video I look like I’m about to cry. That’s because I am. That awkward, tense, three-minute episode took a full day to record and three days to edit. Scratch that. It took three months to record, considering all the time necessary to get the first camera equipment, make the art, film the art, write the scrip, rehearse the script, and then spend the day recording it over and over again.

Today, I can produce a video like that in less than three hours, artwork and all. Instead, of course, I still take three days, but produce much more involved episodes. So, what changed, and how did it change?

The one biggest piece of advise that you will hear from any YouTuber is “stick with it.” Producing weekly content, basically grinding, is the way to make it on YouTube. And, what do you know – it’s true.

I thought that getting used to the camera, to the workflow, and learning the editing software would take many months if not years. But I was pleasantly surprised to discover that I advanced at a geometric progression, leaping from terrified to mildly uncomfortable, to pretty chill, to “hey, this is cool,” to “hell yeah, let’s do this!” within the first three months.

I cannot stress this enough, if you’re new to YouTube, STICK WITH IT.

Of course, an entertainer is nothing without her audience. YouTube only works if someone’s watching. You wouldn’t think it, but one of the biggest time hogs in art and video production is marketing. I spend almost as much time talking about my new video releases and upcoming live-streams as I spend on video production and editing.

I believe that this is one of the most difficult things for artists and creators to overcome. We just want to be left alone and create art. We unrealistically expect that the simple act of posting a video will get someone to watch it. Nothing could be further from the truth. The Internet is oversaturated with information, and getting anyone to see your video takes nothing short of a miracle.

Building an audience is as big an art form as the actual art that I share with you, and this is where things come full circle. Remember back when I could not for the life of me think of the shiny black camera lens as my friend? Well, now I can. In fact, now I have a difficult time seeing anything other than a curious, smiling face staring back me, because that’s essentially what’s happening.

All of you, my viewers, the people who say hello in the live streams, and hit me up on Facebook chat after the show, all of you with profile pictures and personalities, and coloring styles – I’m talking to all of you, each of you, individually every time I look at that camera lens. I see you Laurie, and you Sam, and you Kat, and you Cyndie, and the rest of the 1,000+ colorists in my Facebook group TALM. I see all of you, and all of you are there in my studio, and I genuinely enjoy our time together.

This is why now, you will rarely see me without a huge glowing smile on my face and my arms spread wide open when I start my show yelling “Hellooooo! aaaaaaaand welcome!!!!!” You can’t fake that emotion. You can’t learn it. You have to experience it. But, to get there you have to grow your audience and you have to get to know them. One feeds off the other. As I get more animated and personal and professional, more people join. As more people join, I get an emotional reward for all the hard work, and I take my game a level higher. And on and on it goes.

Now, I’m not at all a big channel. This isn’t one of those “I went from nothing to a million subscribers in a month” success stories. The truth is, my niche – adult coloring tutorials – is quite small, and having started my channel with no video or social media history at all, I had to work very hard and a lot to get to 1.5K subscribers.

I won’t tell you that it’s easy, that you just need to do it and have fun. That wouldn’t be truthful. The truth is, you have to work your butt off, spend some sleepless nights, sacrifice some hobbies and even jobs, accept a life with perpetually dirty dishes and piles of laundry, and reevaluate your whole attitude towards public feedback and criticism, if you want a chance at simply remaining active on YouTube.

I look at channels started by friends and family of famous YouTubers, or see celebrities bored with quarantine kick off brand new channels and immediately get a million or more subscribers on day one. At first, it’s discouraging, but then I remember that it didn’t take John Krasinski one day to get 2 million subscribers. It took him 20 years. 20 years of building up his professional career as an actor and a tv personality. That first YouTube episode invited his entire 20-year dedicated audience, his virtual family. I didn’t have that. I’m building it up now. I’m on day one.

Some of you may look at my channel and think it a huge success. You may have been on YouTube for two years and still have 200 subscribers. You may think you’ll never get to where I am now. You will.

Don’t compare apples to oranges. You are not me. I am not John Krasisnski. We cannot be jealous of each other or be discouraged by the other’s success. We should learn from it. You absolutely can be where I am now. And I absolutely can get to 2 mill subscribers. But we all have different paths that we take. Paths that have already been greatly shaped by the lives we’ve lead so far.

We cannot complain about not getting a head start or a boost, but we can work hard to get to the milestones that we set for ourselves, and remember to set realistic expectations. If I really want a multi-million subscriber channel, I probably need to explore more popular niches, but I may not necessarily want to. I would rather be a big fish in a small pond, and stick to what I’m good at and passionate about. An epic adult coloring channel is better than a mediocre lolcat channel.

So, what’s happening on lisa.mitrokhin.tv these days?

When the pandemic started, I switched from my weekly high production 10-minute recorded art tutorials to daily live streams called  Survival Coloring, and it dramatically changed the mood of my channel.

Coming up on two-months of Survival Coloring, my personal community has grown quite a bit, and I developed much closer connections with many colorists. I enlisted the help of my husband, inviting him to be my “lovely assistant” and a character on the show, known as Tek Support. We’ve had weekly live guests, including molecular biologists, med techs, professional artists, homeschooling parents, crystal collectors, etc. It’s really been life changing, and now it’s time to re-adjust to the flow of things yet again.

Starting Mid May 2020, I will reintroduce recorded tutorials, keeping occasional live-streams, and of course the big two-hour weekend shows like the one I have coming up on May 23rd. I’ve been really enjoying having special guests on the show, and the next guest is indeed special. Albert Jones, the man behind Black Widow pencils, my new favorite brand, will be live on my stream.

I will be working on my original drawing of Black Widow, the Marvel character, using only Black Widow pencils, while Albert talks to us about his new pencil set release, how he got started making pencils, what’s involved in this business, and anything else that the live chat participants wish to know. Additionally, we’ll have a giveaway, where three lucky winners will get new Black Widow pencils sets sent to them directly from the source.

This kind of a collaboration is one of the greatest rewards of being a YouTuber. Suddenly, the people and the companies that you look up to as giants and deities, become regular approachable people that you can invite to your house for a chat. Where else would this be possible?!

If you’re an artist or a colorist, I hope to see you there. It will be quite epic, with much to learn, enjoy, and even win. Coloring Black Widow with Black Widow Pencils

Help my channel thrive!

Many don’t realize, but video production takes A LOT of time, time that I don’t get paid for. What you can do to help my channel grow and succeed is simple. All you have to do is watch my videos all the way through, and hit that thumbs-up button. That’s it. It’s free and fun.

The watch time hours and the likes are literally what drives my channel. The more minutes and likes that my video gets the more likely it is to get picked up by the algorithm and be recommended to someone else, therefore getting more views and more likes. So, if you enjoy my content, please let me know by doing this one simple thing.

I have to say, so far you guys have been an amazing audience, and I cannot thank you all enough for making this journey possible. I’ll see you on lisa.mitrokhin.tv shortly.

Bye. Don’t lick strangers.


Feathers and bubbles coloring techniques

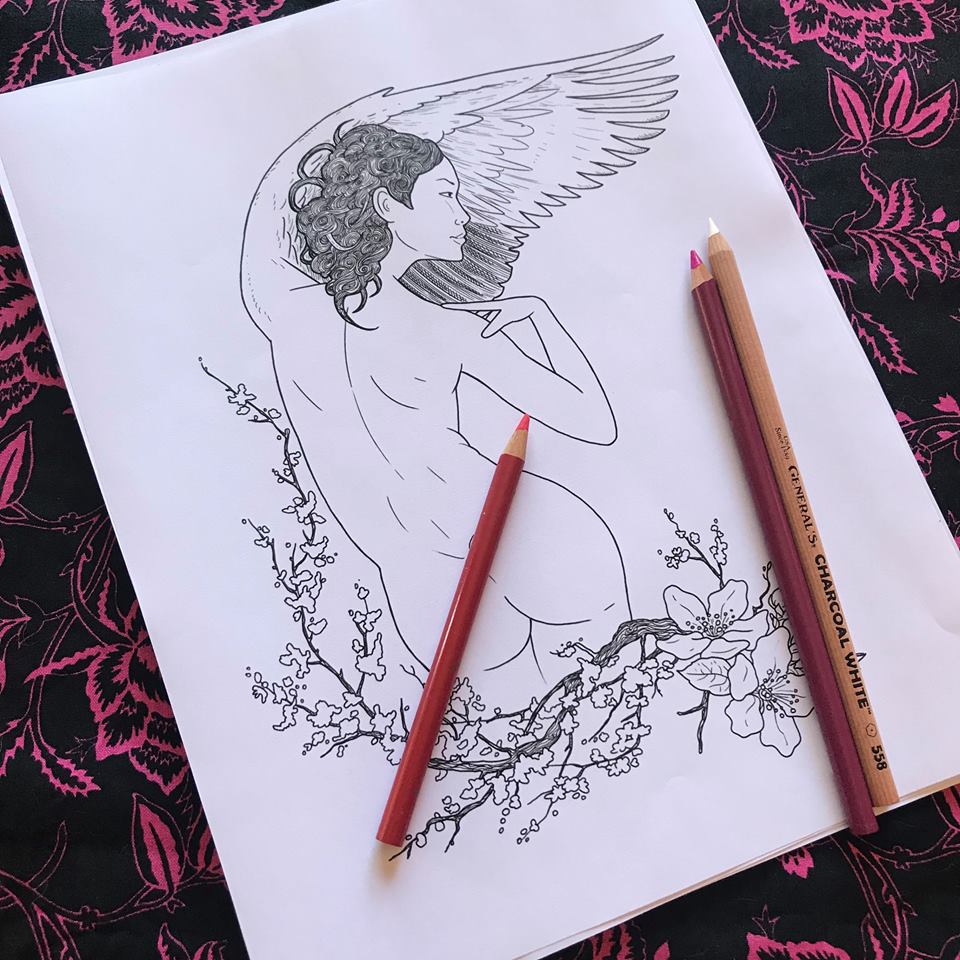
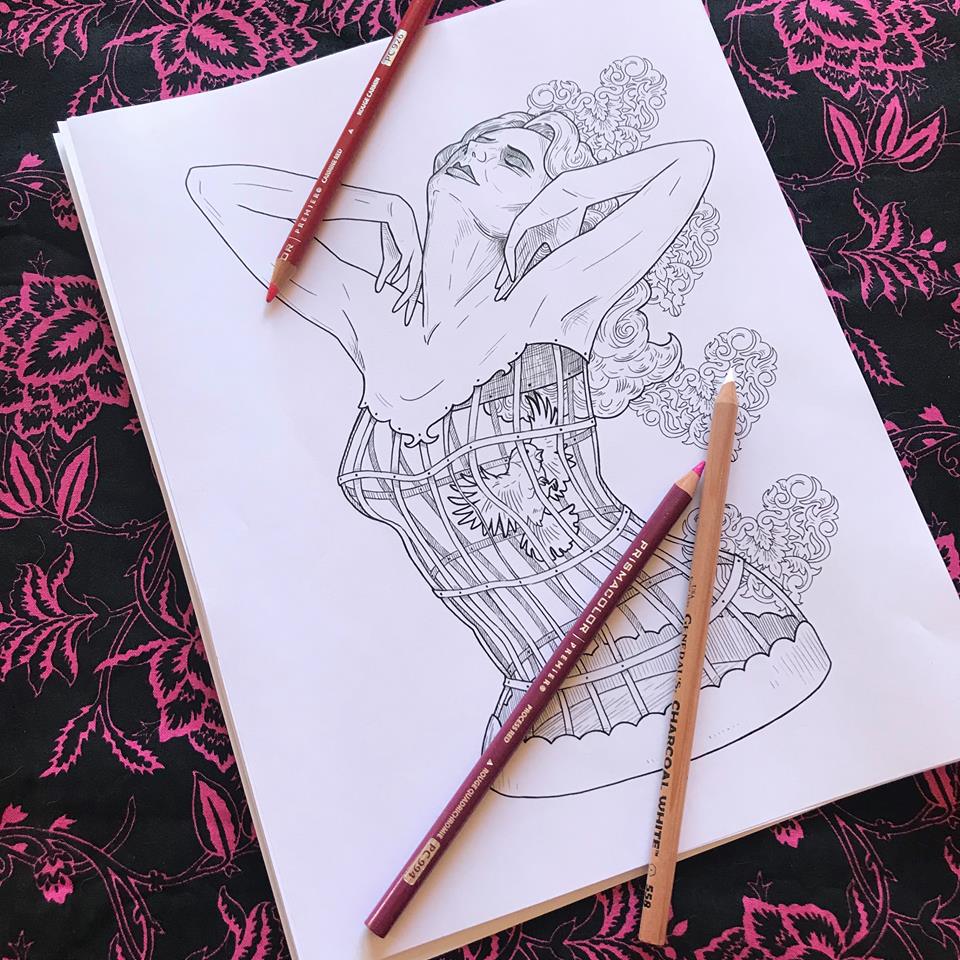
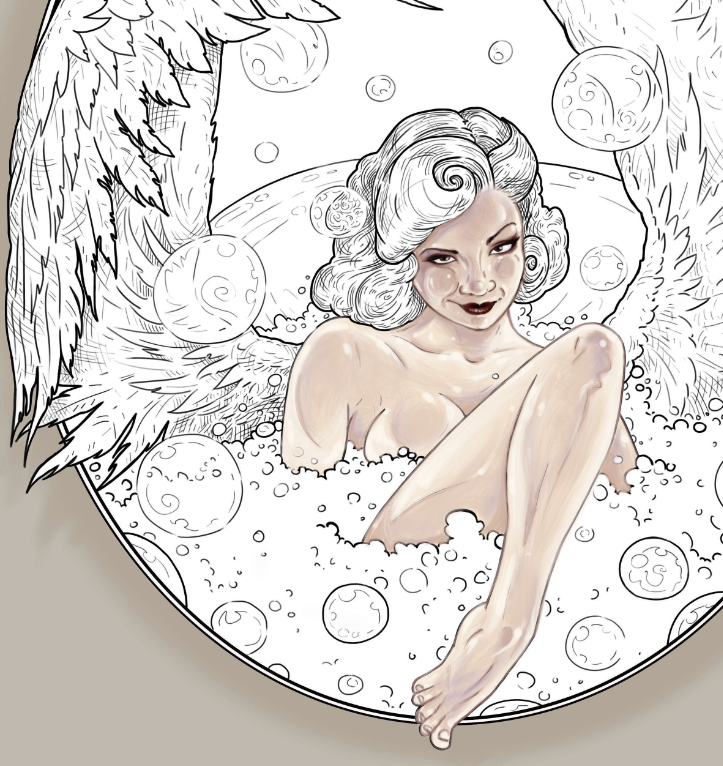
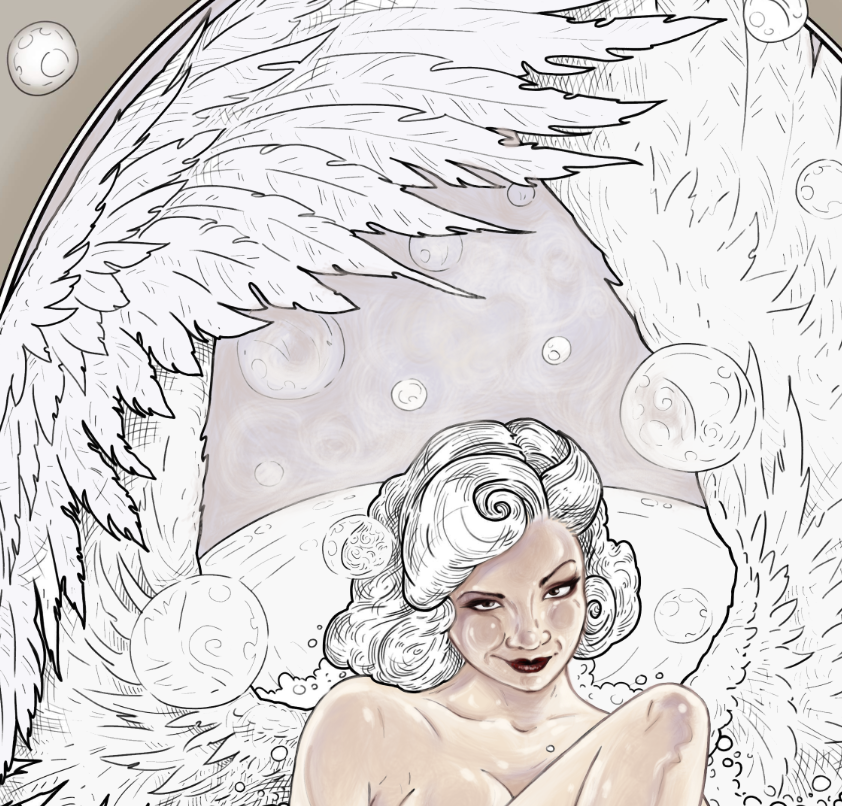
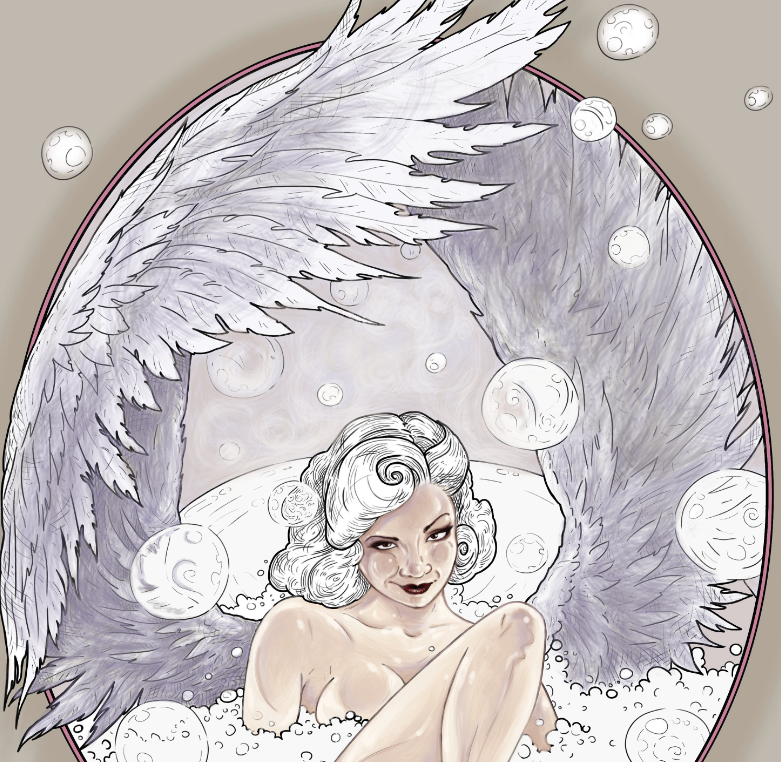
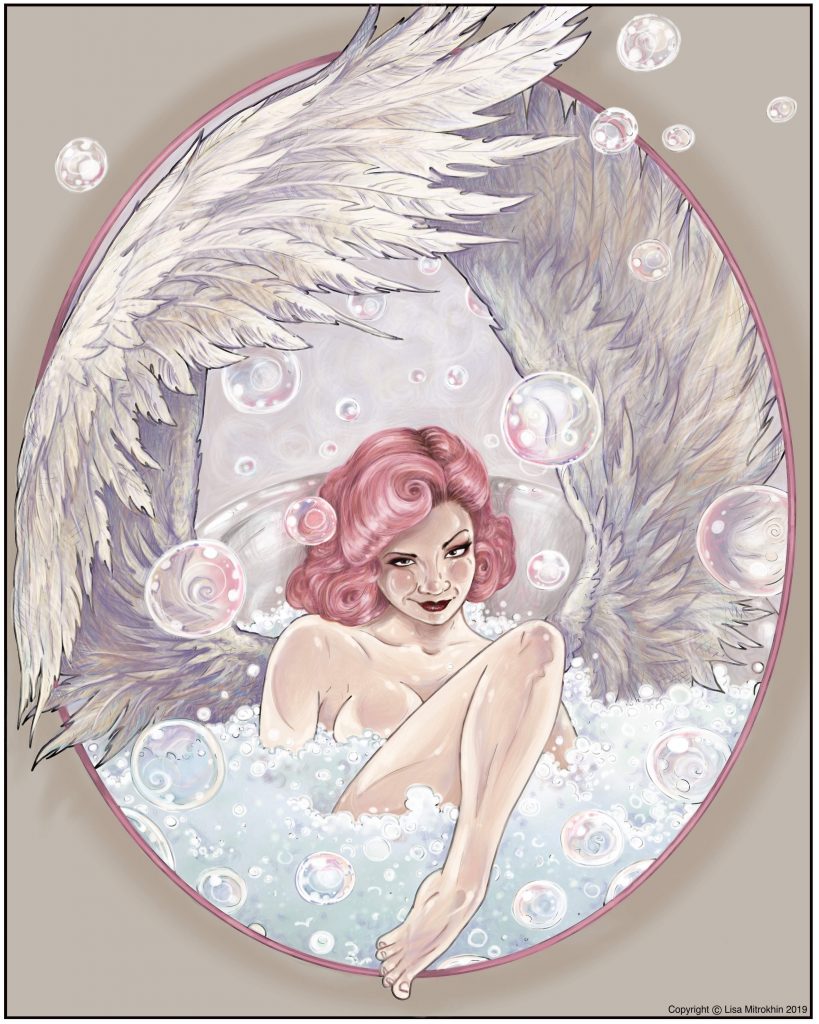
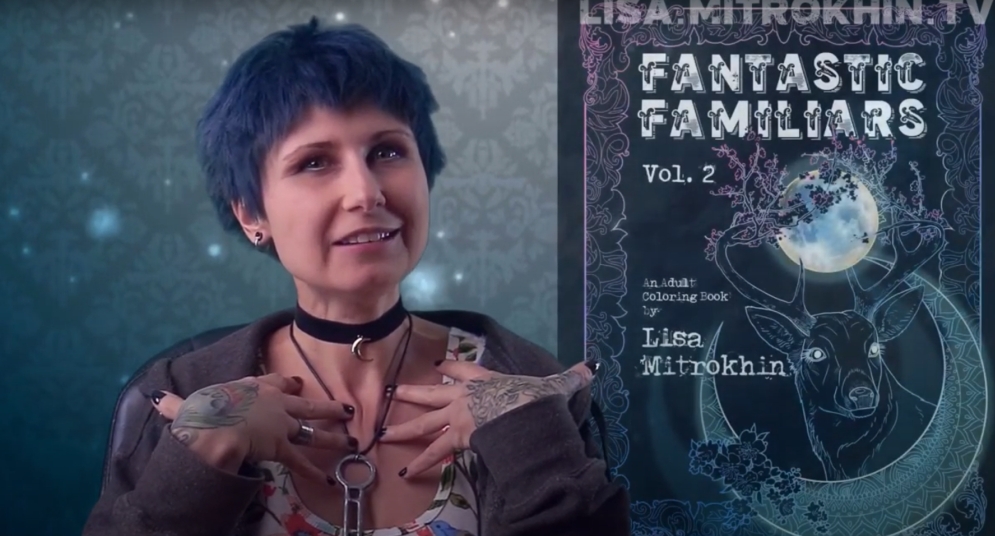
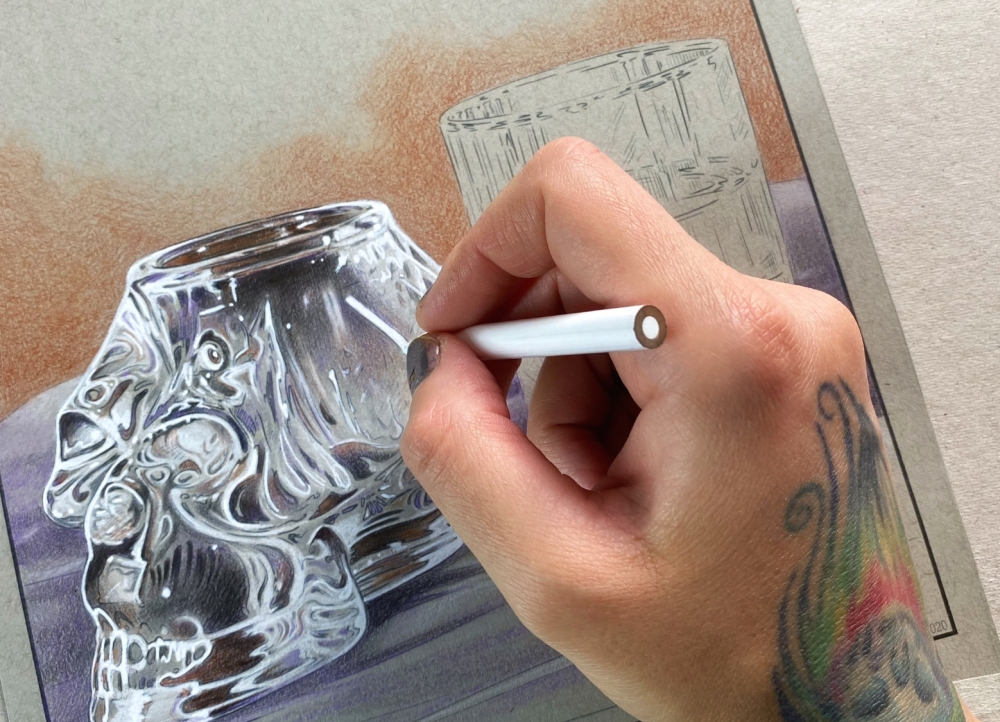
In my art group TALM, I offer monthly coloring events. Each event is unique in subject, theme, and goal, and each always ends with one chosen winner. The winner of the event is rewarded with a unique prize. As a reward for winning my 5 de Mayo event, the winner got to request any tutorial topic from me on either coloring or drawing. She asked me to go over how I color feathers and bubbles. Excited by the unusual topic, I drew a coloring page of a winged angel in a bubble bath. It is this line drawing that we will be coloring today, paying particular attention to feathers and bubbles. Let’s get started.

I will be coloring this image digitally in Corel Painter, but the techniques I am about to apply are specifically tailored for color pencils. As a matter of fact, I will set my drawing tool to be the same types pencils as I would use in real life.

My pencil settings in Corel Painter

Because we are focusing only on feathers and bubbles, I will skip the step by step portion of how I colored the angel’s body. Let’s just jump to the part where her skin and the details of her face are already done.

The order in which you color the subjects of the page is very important. I would not start with the wings and I would most definitely not start with the bubbles. Here’s why. The wings are an accessory to her. We need to know what she looks like first and then decide what kind of wings match her complexion. The bubbles should be the last thing to color because they are opaque and transparent. They reveal and reflect all the colors of the scene. How can you possibly know what color your transparent bubbles should be painted if you didn’t yet paint the scene?

We skip to the part where the body and the face are already colored.

The next part that I like to establish is the background. This will set the mood for my overall color scheme. Many people leave the background for last, but I find that in most instances that is not the best way to go. Establish your settings and your atmospheric conditions first, and then the colors and the lighting of  your main subjects will be established for you.

In this case, I want the scene to be soft and dreamy. I pick very delicate pastel tones of lilac. I may adjust them later on, but for now I am happy with this color. Notice how I didn’t just click-and-fill the space. I took the time to actually color it with my pencil tool, giving it some blurry swirl effects. Whether you are working digitally or with physical pencils, try to avoid solid color backgrounds. That makes the backdrop look flat. Instead, try to suggest some atmospheric perspective with blurry effects and using several similar tones instead of one solid color. When working with pencils, blurry effects can be achieved by smearing and smudging your pencil marks with q-tips, soft erasers, cotton balls, and even your finger.

I have a very clear idea in my head of what color scheme my finished drawing will have in the end. I can close my eyes and literally see the finished piece. When I draw, paint or color, I am actually just reproducing what I already see in front of me. Many people don’t approach drawing and coloring this way, and that’s perfectly fine.

If you cannot clearly see the finished colors or have difficulty deciding what color schemes to use, I highly suggest using what I call inspiration pieces. It’s simple, especially now that we have a world of images at our fingertips. Just look through a whole bunch of images until you see ones that speak to you in terms of light and color. A good idea is to search for various types of photography, and just let the image links take you down a rabbit hole until you come across color palettes that you like. Keep in mind, these should be completely unrelated images. They can be paintings, photographs, screensavers, whatever strikes your fancy. As long as you find pictures in color schemes that look beautiful to you. Pick one and use it as a guide when selecting colors for you piece.

Here are some examples of photography that I found online that are interesting to me for some other projects I have roaming around in my head. Remember, we are only looking at colors and their distribution on the page, not the subject matter. There are literally millions of images out there. Take a a few minutes to look through some of them to find the color inspirations that work for you.

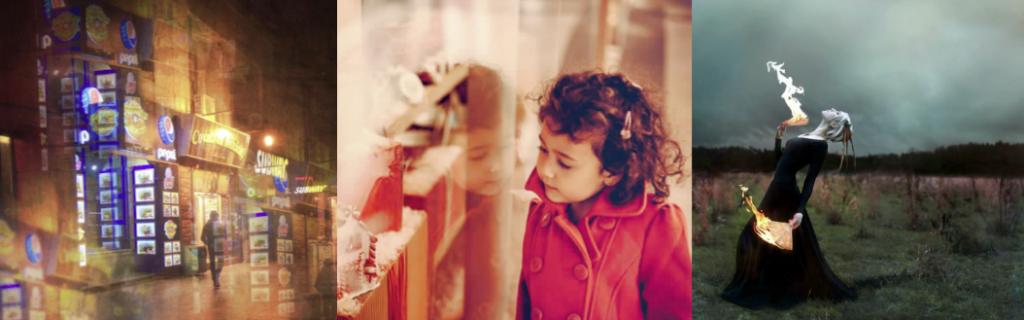
Examples of photography that I found online.


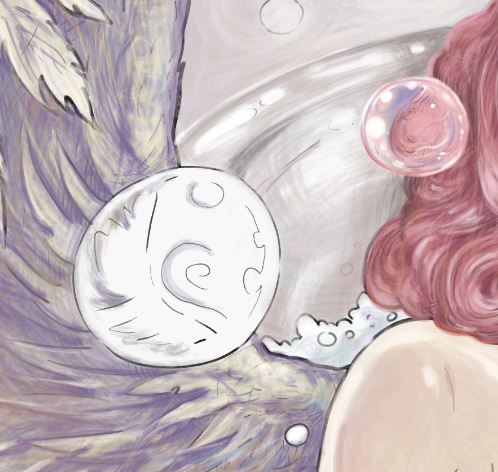
Ok. Let’s continue. Now that you, hopefully, have an idea of your color mood, let’s get those wings painted. I want her wings to be almost white. Not quite perfectly white, but kind of cream-colored. I begin with some very basic grey shadows.

The most common mistake that people make when coloring wings is focusing too much on each individual feather, and losing track of the structure of the wings. Don’t start with feather details. Instead look at the wings as at two objects. How are they positioned? Is one closer to you than the other? Are they reaching forward or back? Is there a curve to them? Where is the light coming from? Where would the shadows be?

In my case, the light in the bath-house is very diffused. There isn’t really one strong light source. The light is soft and generally reflected off all the steam that I imagine is in the air. So I don’t have to worry too  much about harsh shadows, but I do have to give my wings structure. I use a regular grey pencil to start adding shadows to the parts of the wings that are the furthers from us, and little bit here and there to start defining the shape of the wings.

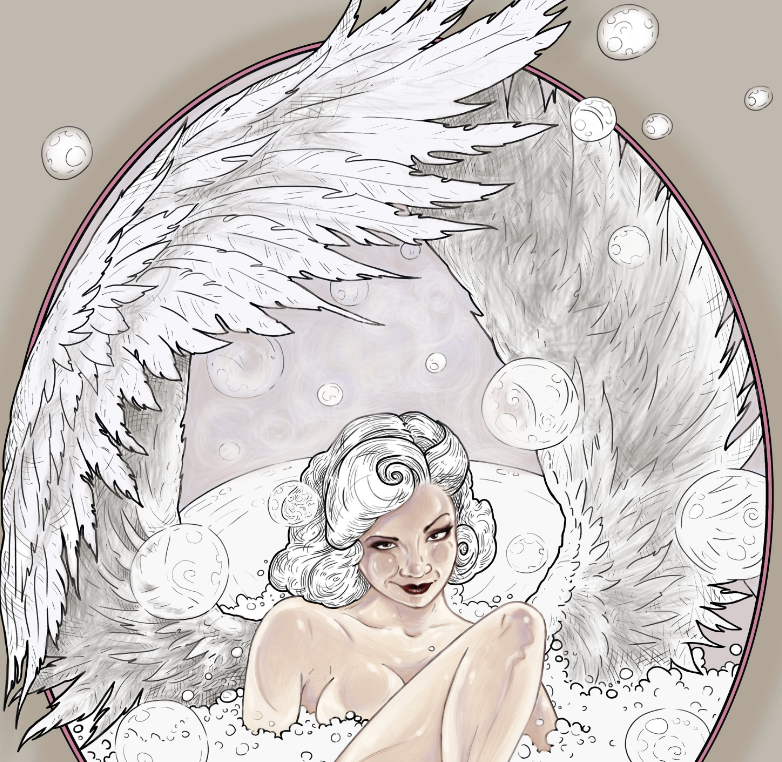
I place my shadows here. I am working very lightly, because every new layer of color that I will add will go on top of this grey. I don’t want to compete with it, but I do want to establish my shadows.

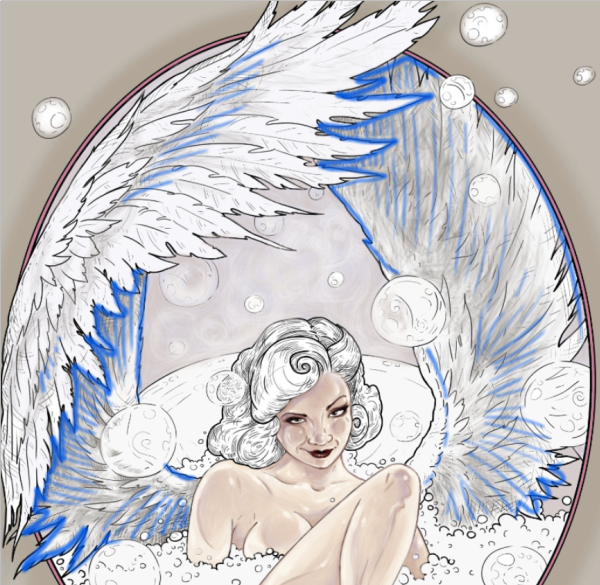
The blue lines indicate the areas where I placed the shadows.

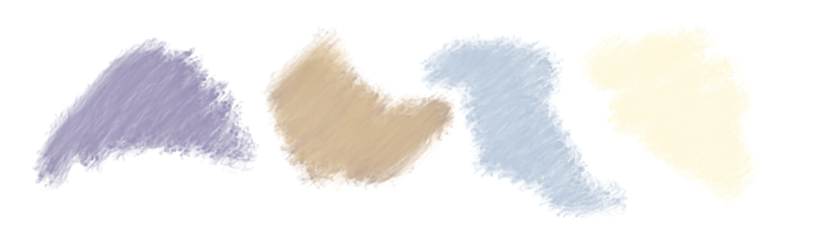
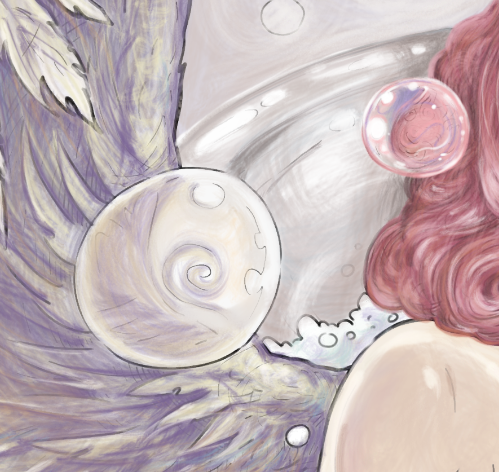
Now I move on to my first color – a soft grayish-purple tone. I add it to the parts of the wings where I’ve already indicated some shadows. This time, I take more care to add more pigment and to make my pencil marks with the direction of the feathers. Feathers are very textured. Part of what will define your texture is your pencils marks.

Notice that my pencil marks are still very rough, but they are starting to give the wings shape. Aways work with the shape of your object and don’t just color blocks of color between the lines. This will give your piece more dimension.

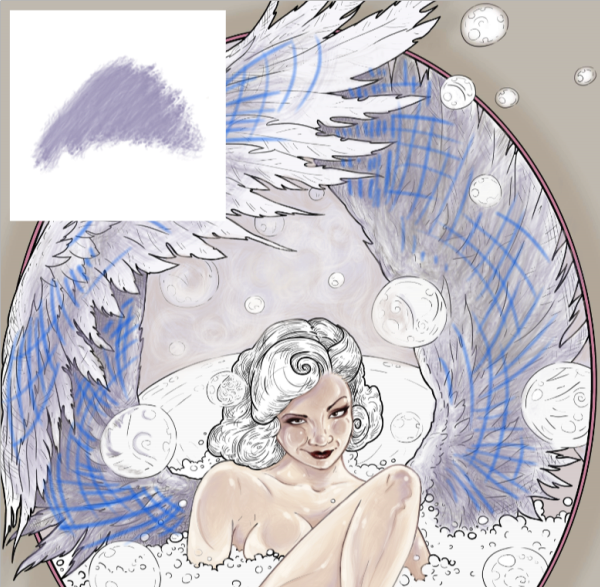
My first color on the wings and the direction of pencil marks.

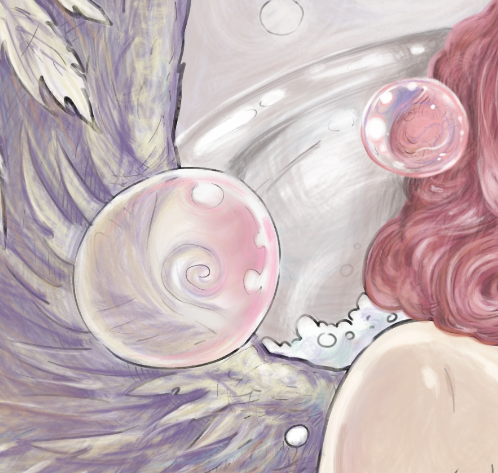
The other way to add more dimension and depth to your subjects is using several colors to build one color effect. Even though I’ve decided that my wings are a solid cream color, I am actually using multiple colors to make the wings look more realistic and 3-dimensional. Granted, we are working in a more cartoony style, but I am going for the semi-realistic coloring of a comic character effect.

My second color for the wings is an ivory blush tone of light brown. I add it lightly here and there, like makeup powder. If I hadn’t told you that I added it, you probably wouldn’t even notice. But compare this screenshot with our previous step where I only added the purple. It’s not a dramatic difference, but somehow there is already a little bit more shape definition to the wings.

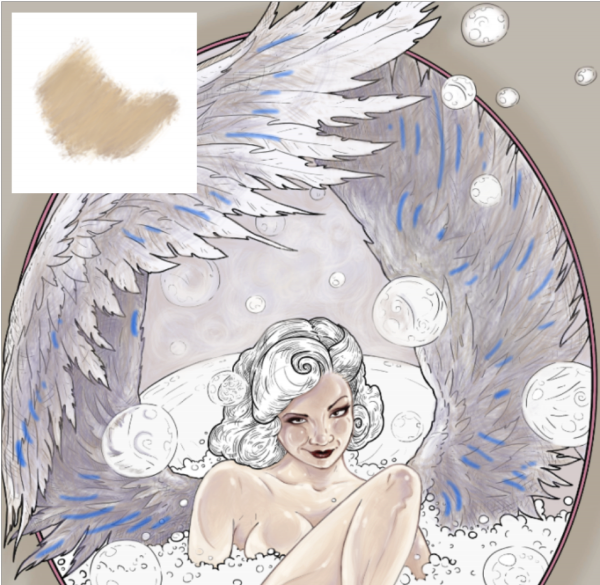
The blue lines indicate some locations where I added minor beige highlights.

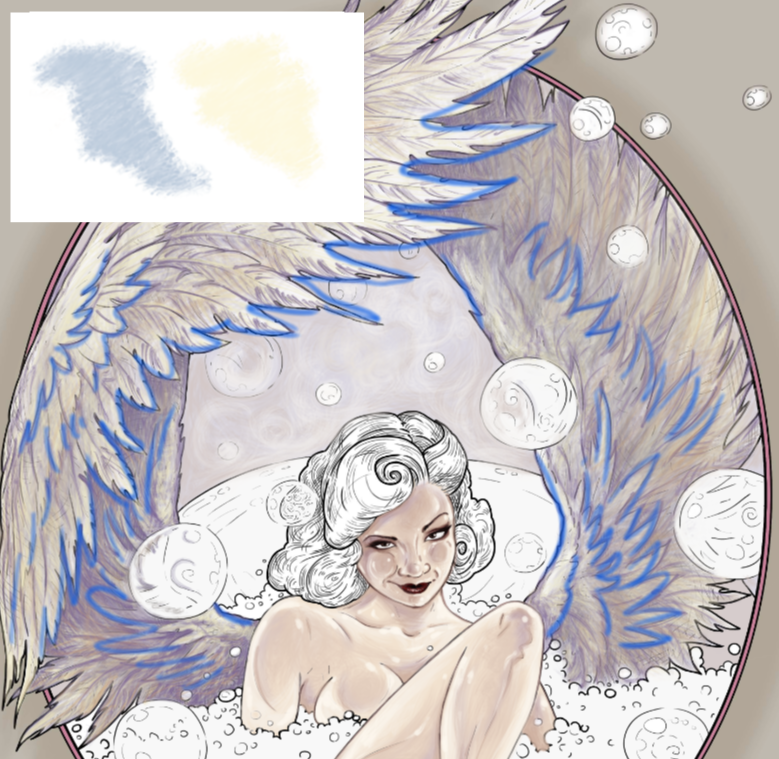
So far, my wings just look kind of grey and dull. Let’s start working with the actual cream color that I promised. I select a very pale, almost yellow, beige and a complementary pale blue to go with it. I am working very delicately with both pale yellow and pale blue to complete my wing illusion, adding the lightest tones to the parts of the wings the are physically closer to us.

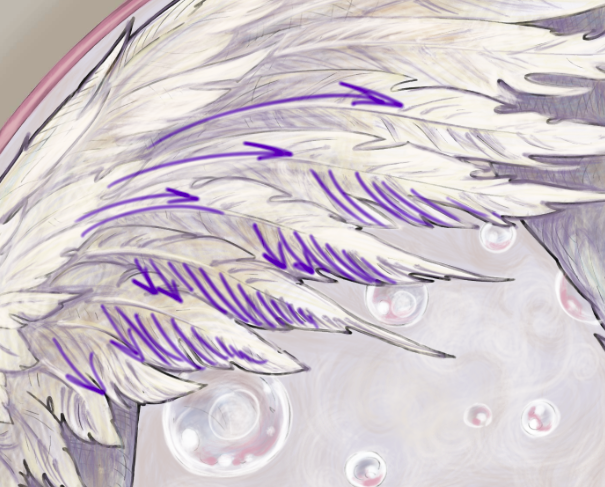
At this point, I actually switch back between all four of my color pencils to balance the coloring. I hide some of the black outlines with my purple pencils, and you can see that I’ve started adding some detail to the individual feathers. Note that I am only adding detail to the feathers that are closest to us. I am barely defining any feather shapes on the wing that is further away. That lack of definition helps create an illusion space. Add more detail to the objects that are closer and less detail to the objects that are further away. You can even use your smudging tool to blur that darker wing a bit.

Notice how I’ve retraced the outlines in these areas with my purple pencil. That gives the coloring a softer feel, which is of course what we want, given the subject matter.

The blue lines indicate places where I retraced black lines with a softer purple.

All in all, these are the only colors that I used to paint the wings. You may finalize your wings with a  touch of white highlights here and there.

Remember to always make your pencils marks in the direction of the fur or the hair or the feathers flow. The feathers are growing left to right here. My pencils strokes are also left to right. The eye of the viewer will pick up on that and see it as more natural, even if the brain doesn’t realize why the illusion works.


Now, I could take this further and eliminate all of the black lines. Some people take the time to do that. If this was a piece for publication or print, I would invest in that effect, but for the sake of the tutorial, I’m ok with leaving some traces of the original black outlines here and there.

You can also take this further and add really fine hyper-realistic detail to some of the feathers, but take care not to overdo the effect. When we look at objects we see concepts, not full detail. When you look at a bird with open wings, your brain does not register every single feather. It registers two symmetrical wings, the overall feather color, the overall feather texture, the darkest parts, and the lightest parts of the wings. A successful, drawing, coloring or painting is one that delivers the message in a way that our brain already interprets information. So, don’t sweat those tiny details. Sometimes, less is more. Light and shadow are far more important than detail.


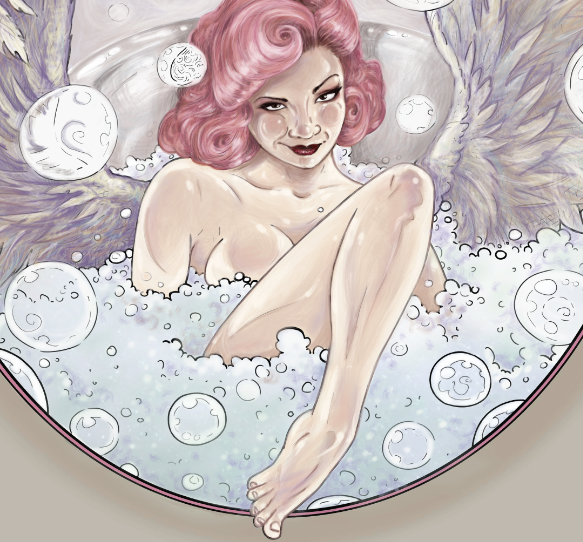
All right, let’s move on. Before we can start adding bubbles all over the place, we need to finish coloring everything else that remains uncolored in the scene. In this case it’s the tub, the soapy water and her hair. I chose to paint her hair in a color that will stand out. This color will be the centerpiece of my drawing. A little burst of visual emotion in an otherwise pale and subdued scene. Plus, with a vibrant color, I can clearly demonstrate the color selection for the bubble painting.

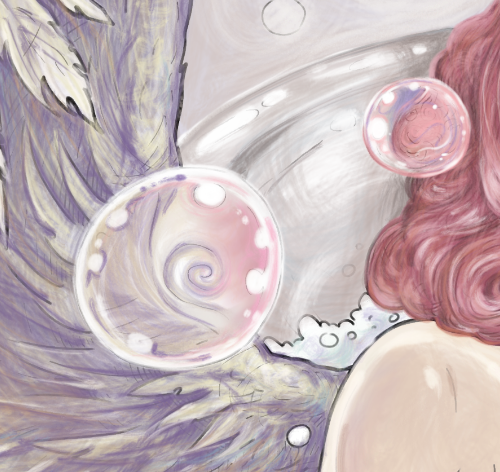
Let’s start on our first bubble. There is one floating in front of her hair.

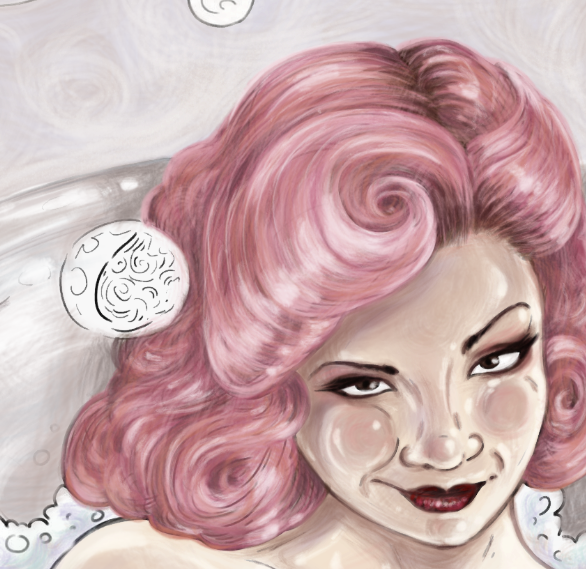
I start by working with the same pencils that I used for the tub and for the hair, and very lightly adding those tones to my bubble. I am not going for detail here at all. In fact, on the contrary, I want the effect to be blurry. In real life I would use a q-tip to smudge the color all over the bubble.

Keep in mind that soap bubbles are not just 100% clear. They are opaque, and they kind of distort everything that you can see through them. In this case, the line drawing already suggests where the colors should go. (The line drawing, of course, being made by me 😀 I like to give my colorists enough suggested information to guide them, but not so much that there is no room for their own artistic decisions).

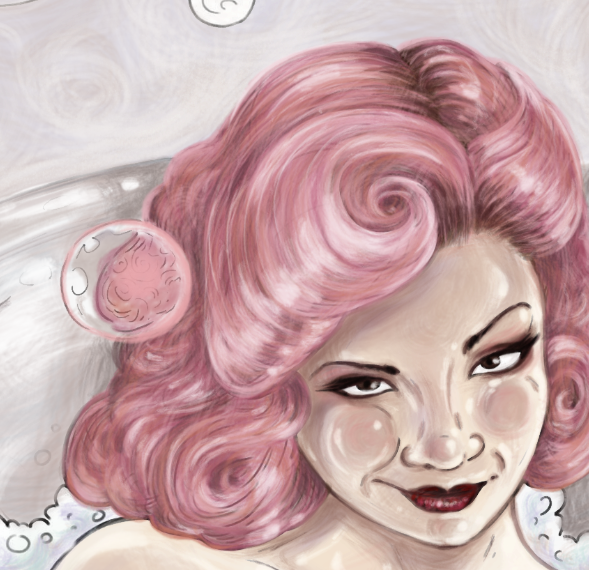
Looking at the overall color scheme of my whole composition, I pick one other color to put into my bubble to make it stand out a bit. I pick purple. I could have picked blue or beige, and they would have worked just as well. There is no one perfect or correct way to draw a soap bubble. All soap bubbles are unique and each has an element of randomness to its swirls and blurry effects.

Experiment. See what works in your composition. For instance, if you paint the rest of your scene with completely different colors from the ones I chose, making her hair green and the tub blue, inserting this soap bubble painted exactly the way that I did, will make absolutely no sense. Your bubble has to work with your color scheme.

I add some white to the suggested places and also hide the black outline with pink and white. As much you can, try to make the soap bubble outline white. That will really help with the illusion of weightlessness. You can do this with a white marker, a white pen, whiteout, white pencils of certain brands (I like Prismacolors the best), acrylic paint, white charcoal, and many other easily available art tools. Try different things to see what works best for you.

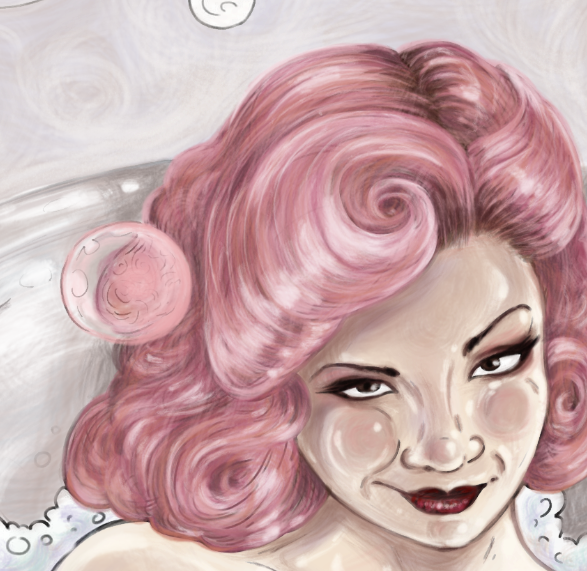
Finally, having observed my new soap bubble, I decided to add a few more little white highlights here and there, to make it a little shiny. If you are not adding white with a separate white pigment tool, take care to leave the designated areas uncolored, using the white of the paper as your lightest sections.

Remember the element of randomness. There is no one formula for where the white dots and circles should go. It’s all about what feels right to your eye. I tend to keep the center of the bubble a little darker and the edges lighter. For me, this is the perfect effect.

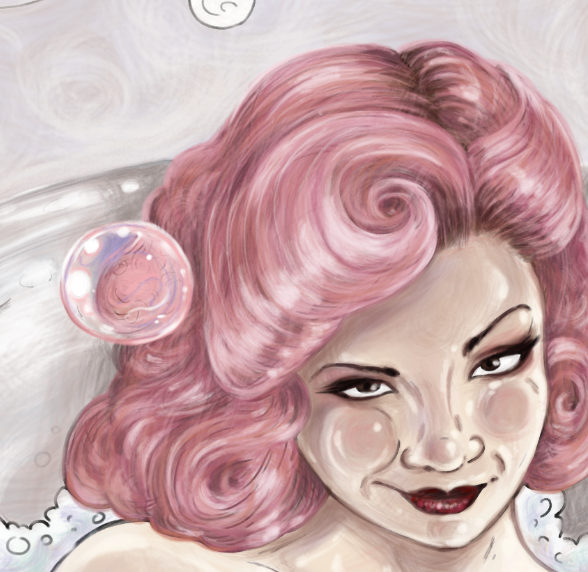
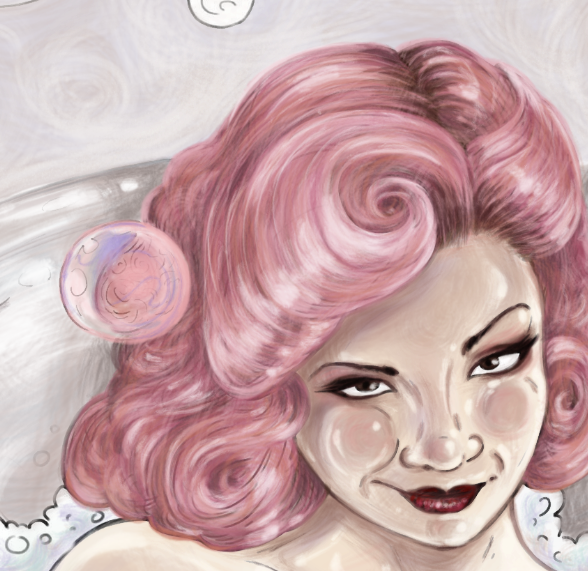
I am happy with how this bubble turned out. Let’s move on to the next. How will this bubble be different? Well, the most obvious thing we can see about this one is that it is in a different location, with different colors surrounding it.

I use all the colors that are around this bubble, but I make them slightly more pale, because bubbles are soapy, and once again I am going for the smudgy effect.

I add some pink glow on the side of the bubble that is closest to the pink hair. This is very import. This will be true for every bubble that we color. I want an obvious pink reflection on every significant bubble, on the side that is closest to her hair. This should be consistent throughout my piece.

I complete this bubble with some white highlights. Notice that they are different in size and placement from our first bubble. A common mistake that colorists make is coloring every bubble in exact same stencil way. That just doesn’t look natural. The light is playing off of everything in this setting. Bubbles are even reflecting other bubbles. We are not going to get technical and photorealistic here. I want to stick with the cartoony style, but we can imitate a realistic look by staying true to that element of randomness we talked about.

Every bubble should be unique and working with its surroundings. Let’s take a look at a few other examples. Notice that the bubbles are in fact colorless. This is why you cannot “color” a bubble without first coloring the rest of the scene. They are little prisms for other colors around them.

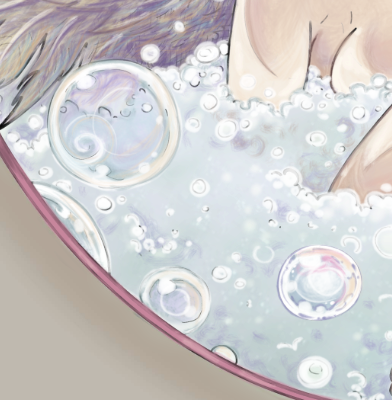
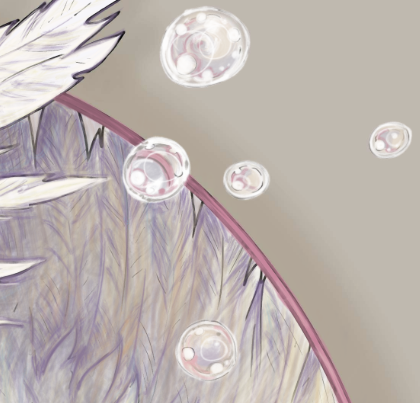
Now that all my bubbles are complete, note how each of them is perfectly unique and random, yet they all have one consistent principle – the reflection of the pink hair color. The pink glow is not just randomly placed here and there. It is very strategically placed on each bubble directly opposite the source of the color.

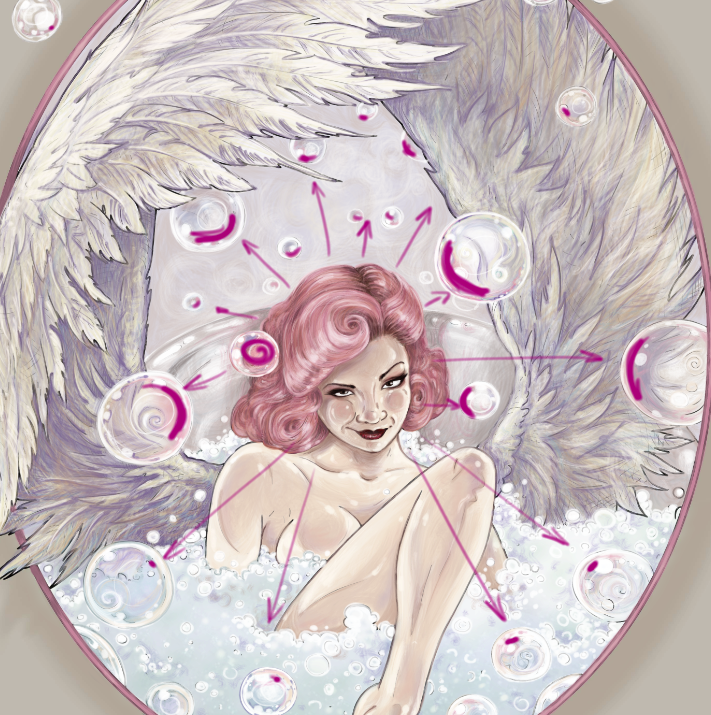
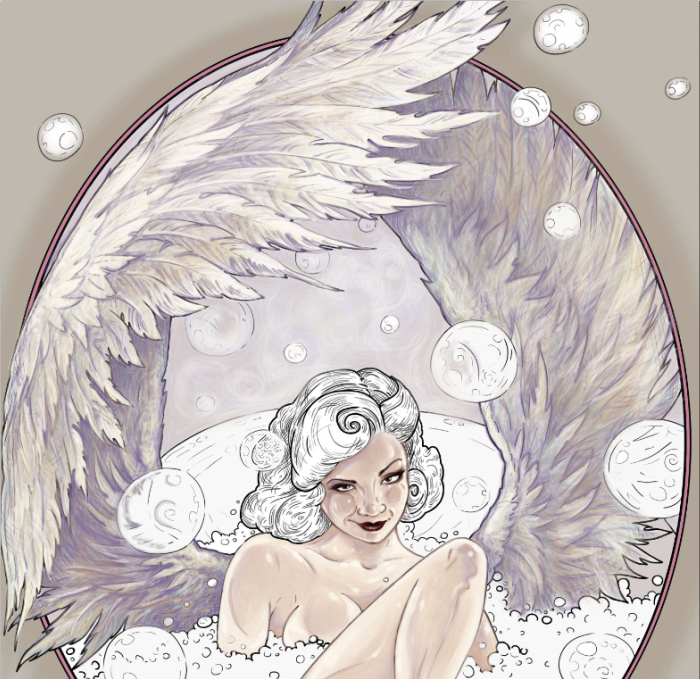
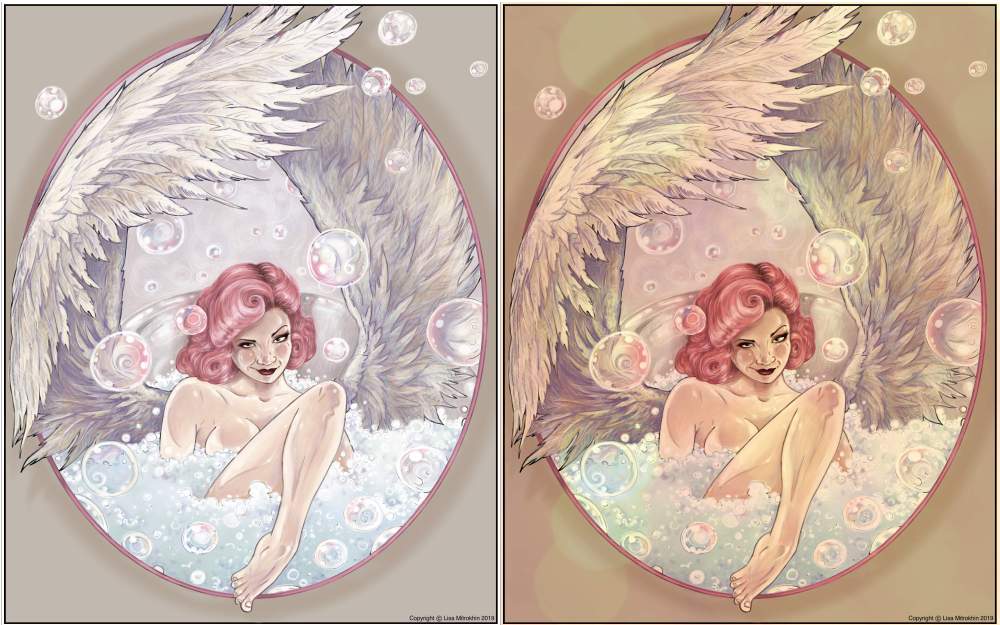
Now that my coloring is complete. I look over the entire composition, and study it. Is anything off balance? Does anything look too dark or too light? Do any of the bubbles stand out in some awkward way? This is the time to tweak little things here and there to bring everything to perfect harmony. I don’t see anything obviously wrong with my coloring, other than my overall tone. Looking at it now, it’s too crisp and there is too much pure white. I would prefer to look at this scene through a yellow or an orange filter. If I were working with real pencils, I would pick a few golden yellow tones and begin to carefully add some highlights here and there. Working digitally, I can skip 15 or 20 minutes of tedium by adding a single layer in the filter color that I like. Sorry, had to cheat at least once during this tutorial. You know me. 😉

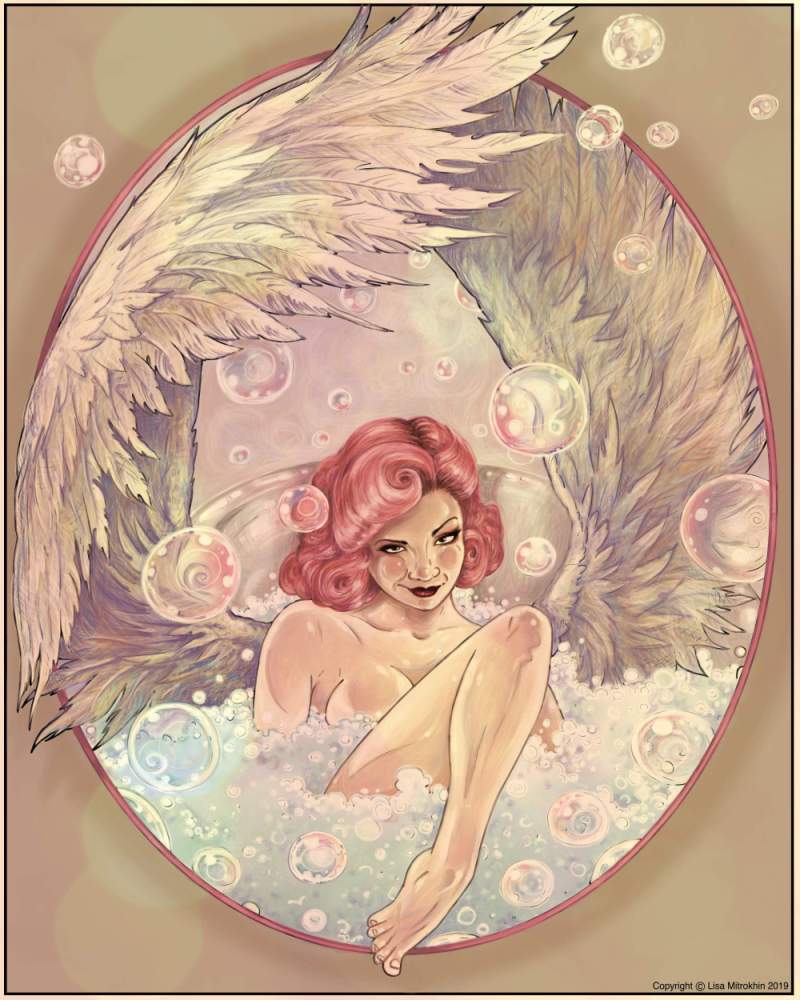
Here are the two versions of my finished piece. Honestly I like them both. Both are perfectly fine, and I could have achieved the second effect from the very start. The yellow light effect just didn’t occur to me until I saw the final piece.

So, here she is – a winged angel in a bubble bath.


I hope you enjoyed this tutorial. The line drawing version of this page will be offered for a one-time coloring event in TALM, the winner of which will also receive a kick-ass prize, like this one. Remember that this is by no means the one and only way to approach feathers and bubbles. I highly encourage you to experiment and also to remain true to your own style.

If you enjoy my work, and wish to come join us in these fun events for a chance to win cool prizes, I hope to see in my group, TALM. Just click here, and join the fun.


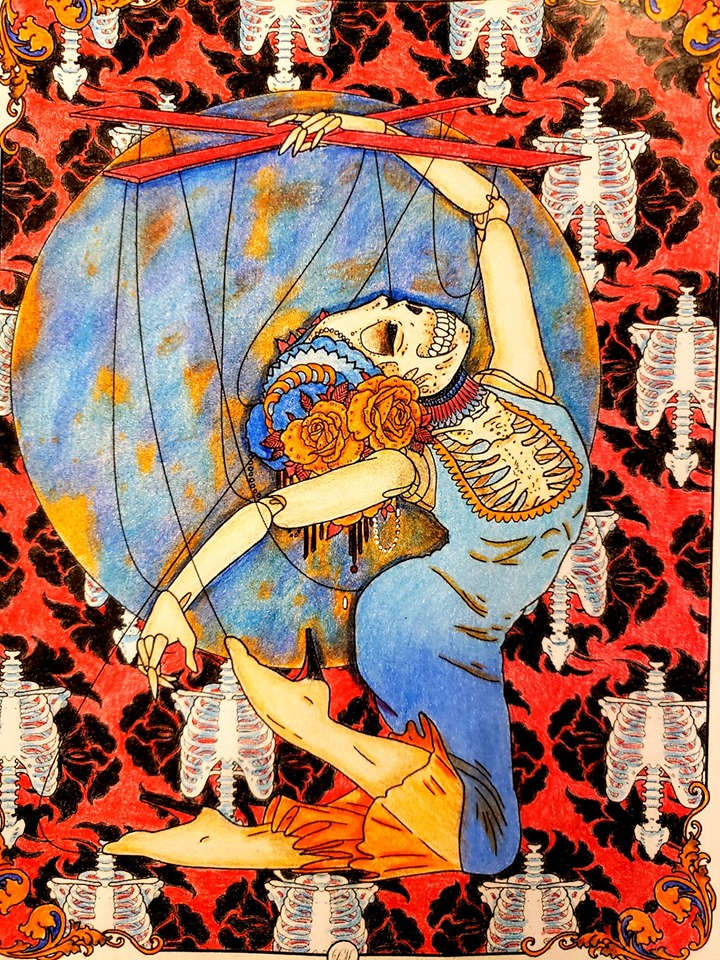
Special thanks and congratulations go to Leatha Loftis, the winner of my 5 de Mayo event. This was the coloring that won her this tutorial.


Nights And Mares AMOR flip-through

For Valentine’s day 2019 I wanted to bring my fans something special, something different. Nights And Mares AMOR is the latest in the N&M universe and true to its nature it is a union of beauty and oddity. In this volume, you will find classic characters as well as strange mythical creatures. You will discover passion as well as heartbreak, the lust of a lover and the love of a mother alike.

Based on your requests I tailored these illustrations to reflect my personal drawing style over the confines of traditional stark coloring lines. I want you to experiment with different methods of coloring, with considering the light source, with really giving these compositions mood through light and color. These images are not designed for the click-and-fill style digital coloring. They are, however, excellent for the digital painters as well as traditional pen, pencil, and watercolor colorists.

Nights And Mares AMOR is available in a digital (PDF) download form on ETSY and in print on Amazon.

Enjoy and happy coloring!


Get your PDF download here.

Get your paperback here.